Table of Contents
The digital clapperboard is just a wooden clapperboard using digitally controlled displays instead of having to write the take information the board.
introduction
Since the video camera is often at a distance from the recorded scene, the audio recorded by the camera is of lesser quality (less loud, with interferences for other audio sources, …). To compensate this loss you have to put a microphone near the recorded audio source, using a better quality microphone and an audio recorder dedicated for this task (with hardware recording audio with a higher quality). Consequently you have audio recording separate from video recording, and you need to synchronize the two recordings afterwards.
A simple trick to help with this is to have a clap, for example just by clapping hands.
This produces a sharp short sound easily identifiable on the audio track, and on the video recording the clap is also visible.
You can then synchronise the two recordings, with a precision of up to a frame.
Furthermore the video camera often also records audio, and since the clap is loud it is also present in this audio track, allowing synchronising the audio tracks themselves with a higher precision than frame-based (although it will not be “visible” in the resulting mix).
I actually even wrote a script which does this automatically, provided the two corresponding recordings.
The other difficulty is that you need to keep track of which audio recording corresponds to which video recording. This is where the clapperboard comes into play. There you can write which take you are currently recording (and other information such as scene, date, …) which is visible on the video recording, and have someone announce it so to be also present on the audio recording.
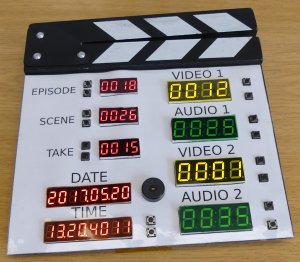
And instead of having to erase and rewrite the take number after each take on the board I wanted to have a digital display, and just change the number using buttons. The same way I could show the scene, the episode (for my podcast), and even the date and time. But also because the video and audio recordings use numbers in their file name, the displays will also show these. This allows me to know which audio file corresponds to the current video file, without having to cross reference the take numbers in all video and audio recordings. And instead of having to announce the take number so to be present in the audio recording, a buzzer with take care of this task instead of myself.
One problem remains though: you have to ensure the recordings are synchronous so to prevent drift over time. For short period recording this drift might be negligible, but for long period you can either have a final clap to synchronize after-hand (e.g. in movie production), or use a common time source such as the mains frequency (e.g. in broadcast television).
hardware
As base an inexpensive wooden clapperboard is used.
To display the numbers 7-segment displays are used because they are simple and bright:
-
- 3x 0.36“ red (higher contrast) for episode, scene, and take
- 4x 0.56” yellow and green (for easier reading) for two video and two audio tracks
-
- 1x for date (YYYY.MM.DD)
- 1x for time and frame (with configurable frame rate)
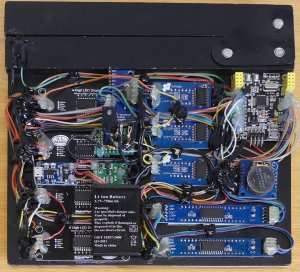
The two MAX7219-based displays are chained, while the seven TM1637-based displays are multiplexed (just the clock signal, the data signal can be shared) using a CD74HC4067 (archive) 16-channel analog multiplexer (periph. 8).
The date and time are retrieved from a tiny RTC module based on a DS1307 (archive), with battery to keep the RTC running (periph. 2). This module also provides an I2C EEPROM (AT24C32) which is used to save the numbers.
The numbers (and seconds) can be adjusted (and disabled) using up and down buttons in the front (multiplexed in a 4×4 matrix). A button at the clap also detects when the clapped is action (periph. 3), cause the buzzer in the front to Morse the scene and take numbers.
The clapperboard is powered by a Li-Ion battery (periph. 4), connector to a battery charger and protection (periph. 5), and 5V step-up converter (periph. 6). A custom power control board allows to switch all the clapperboard off (after 30 seconds) so to prevent it from draining battery (periph. 7). A spring-based shake switch will power the clapperboard back on (and keep it running) when the clapperboard is moved around.
Everything is controlled by a STM32F103 micro-controller-based core board (periph. 1). The source code is available in the git. This firmware release also include binaries and documentation.
future
The prototype used off-the-shelve modules (displays, micro-controller board, RTC, …) linked with wires. The next version would used a proper dedicated board replacing the board (just reusing the clap), removing the need of wires.
Other small improvements:
- use the STM2F103 internal RTC instead if the DS1307
- use the internal backups registers instead of the EEPROM
- use only MAX7219 7-segment drivers and remove all TM1637 drivers (they are far inferior and need an additional multiplexer)
- use only red and larger 7-segment displays since the contrast is better
- use proper SMD components for the power controller (I used lying around through-hole components)


