This is an old revision of the document!
Table of Contents
The firefly conductor is a vacuum fluorescent display (VFD) driver/controller.
Main parts:
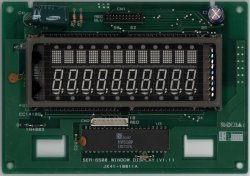
- the VFD has been salvaged from a Samsung SER6540II cash register.
- it came with Supertex HV518 VFD chips to drive the individual segments of the display.
- I use a STM32F103 micro-controller to control the display.
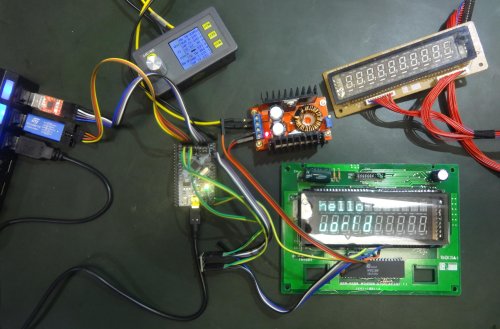
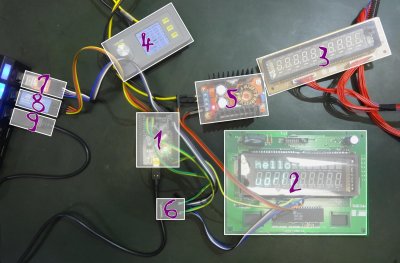
setup
- STM32F1 development board, based on a STM32F103C8T6 micro-controller (32-bit ARM Cortex M3, 72MHz)
- the main VFD I salvaged from a Samsung SER6540II cash register (cashier side)
- the secondary VFD I salvaged from a Samsung SER6540II cash register (customer side). this one is broken though.
- main power supply
- adjustable boost converter to drive the VFD
- level shifter to connect the 3.3V STM32 signals to the 5V HV518 pins
- USB to UART converter (SiLabs CP2102 based) to communicate with the micro-controller
- SWD adapter (ST-Link v2 clone) to flash the micro-controller
- USB to power (providing 5V), flash (using DFU), and communicate with (using CDC ACM) the micro-controller
VFD
introduction
 The SER6500 VFD comes with 3 Supertex HV518 VFD drivers (2 are hidden behind the display).
They each can driver 32 channels (up to 90V). The VFD segments start already to be visible at 5V, but to get them bright you need higher voltages (I use 60V). This is particularly important because you have to drive the digits and matrix one after each other. If you do it fast enough, thanks to the persistence of vision they will not appear as flickering. But because the segments are not on all the time, you need to drive them with higher voltage so on average they appear bright enough. I drive the VFD with 60V and use a 100 Hz refresh rate.
The VFD has 10 digits (7+3 segments) and 12 dot matrix (7×5 segments). You would need 10*(7+3)+12*(5*7)=520 pins to drive each segment individuals. That's far too many. This is why they are multiplexed. One pin drives the same segment across all digits (or matrix). And you can select which digits/matrix you want to drive individuals. Thus is you want to display different text on the digits/matrix, you first drive the grid for this digits/matrix (and only this), drive the segment for this character, and then you do the same for all others (one after each other). That leaves us with 10+(7+3)+12+(5*5)=57 pins. And this is also why 3 VFD drivers are need, because each can only control up to 32 channels.
HV518
Controlling them is pretty easy.
You just:
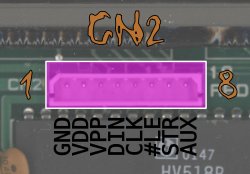
- provide power (5V on the VDD pin)
- send serial data into the built-in shift register (using the DIN and CLK pins)
- latch to output the data in parallel (using the NLE pin)
- enable the output buffers (using the STR pin)
- this drives the 32 high voltage channels (with the voltage provided using the VPP pin)
The drivers also provide a DOUT pin which will relay the serial data. This allows to chains them and shift the 3×32 data bits using a single line (the CLK pin is shared).


